FIND DEFECTS, IMPROVE QUALITY
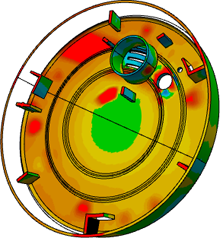
Quality inspection using 3D scanning is a fast and simple way to compare your as-built physical objects to their as-designed digital model, easily uncovering surface deviations such as warpage, tooling deterioration and other manufacturing defects. You can realize significant and quantifiable results by improving your manufacturing process with OUR quality inspection services.
Traditional quality inspection techniques involve using a coordinate measuring machine (CMM), which requires contact with the object being measured. While CMMs are great for capturing prismatic features, 3D scanning is the ideal choice for capturing data of complex and freeform shapes for inspection purposes. Because 3D laser scanners capture surface detail in such high resolution, they have the ability to detect deviations over an entire object, which can be critical for inspection validity.
Our expertise with a wide variety of inspection technologies gives you the ability to:
- Quickly compare as-built to as-designed
- Find and fix manufacturing defects
- Measure cross-sections
- Identify areas in and out of tolerance
- Locate warpage
SIMPLE YET INVALUABLE
Whether you are inspecting industrial equipment or performing first article inspection, 3DScanCo has the tools you need to complete your project. Our engineers understand all your manufacturing process requirements, from prototyping to production, and can help you identify where problems may originate. Our detailed reports show you exactly where deviations exist, saving you time and money over traditional inspection techniques.
Even one-time services such as quality inspection can help you realize the benefits of a cheaper, faster, more efficient manufacturing process. The assurance of knowing your object is created to its design intent will give you a competitive advantage only 3D laser scanning can offer. Let us help you simplify your inspection process!
QUALITY INSPECTION REPORT TYPES
for most of our clients, colormap deviation and cross-section analysis reports provide them with enough data to update their manufacturing process. However, we can provide many other reports that help you verify your designs and uncover manufacturing defects.
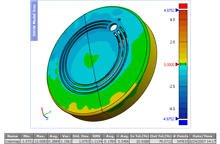
 COLOR MAP DEVIATION
CHARACTERISTICS
- 3D model that you can rotate
- Highlights deviations between as-built objects and as-designed CAD models
- Quickly Identify areas in or out of tolerance using color scheme
WHEN TO USE
- Analyze hard to quantify issues such as part warpage or performance surface matching
- When Go/No-Go results are required
- Complex or free-form shapes
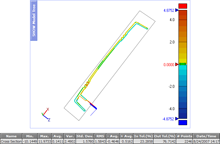
 CROSS SECTION ANALYSIS
CHARACTERISTICS
- 2D analysis at specified locations of a model
- Compares cross-sections of as-built objects and as-designed CAD models
- Highlights deviations in color
- Cross-sections can be taken anywhere on model
WHEN TO USE
- Part thickness needs to be verified
- Specific cross-section shape is desired
- Further customization of as-built condition
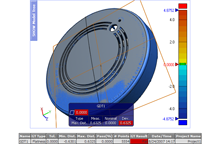
 GD&T
GD&T
CHARACTERISTICS
- Geometric Dimensioning and Tolerancing
- Standard method for comparing as-built objects to as-designed CAD models
- Angularity, circularity, concentricity, etc.
- Repeatable test with quantifiable results
WHEN TO USE
- When standard GD&T measurements are required
- Specific quantifiable measurements are tracked across many parts
- Verify prismatic features built to within tolerance
 OTHER INSPECTION REPORTS
We can analyze and inspect your object using many other techniques and create custom inspection reports tailored specifically to your needs. Below is a selection of additional quality inspection reports we have to offer:
- Blade Analysis
- Thickness Deviation
- Gap & Flush
- Boundary Deviation
- Silhouette Curve Deviation
- Reference Geometry Deviation
- Virtual Edge Deviation
- Comparison Point
